Saturday, September 19, 2015

The DoSeum Re-Do Recess Event-1950s Green Drop Waist Sundress-Butterick 7754


My girls and I attended a cocktail event at San Antonio's DoSeum. It is a children's interactive museum, and this particular event was a chance for adults to play, socialize, and partake of food and drinks. I wanted to make a fun little dress to match the spirit of the event. I had this Butterick drop waist sundress pattern, and this fun green swirl cotton fabric. I paired this fabric with a matching, solid green stretch cotton sateen 


This was a swift little pattern. The neckline and armhole trim were made of my print, it was sewn to the bodice, then folded and slip stitched. This was the most time consuming part of this pattern. I love the effect of the trim, though. It is chic, fun, and such a great little detail.


The gathers at the top bodice are ideal for the bigger busted girl. I am a B cup, and there was ample room for up to a D. The front and back darts are super flattering. The skirt piece is one long, folded piece with a single seam. Gathered at the drop waist, it has a semi-full silhouette.


As you can tell....the drinks were flowing at this point hahahahaha!!! They were serving some watermelon mojitos that tasted just like a Jolly Rancher. While super yummy, I think they crept up on us quite quickly!!


The above picture, a bit more dignified, was taken and published for the website mySA.com . Anytime my girls and I go out to events like this, it has been a running goal of getting 'seen' hahaha. The website is a local news and events go-to page, so we were very honored to be posted!!


Later in the night, and The Running Man kicking in....thanks to those delicious mojitos!! LOL Back to the pattern...the finished measurements for this dress were Bust 40",. Waist 32", Upper Hips 40". The darts were perfect, so I ended up taking in about 2" on each side seam to take up the overabundant ease. Due to my stretch cotton sateen, I didn't even have to place the side zipper. 

I really loved this pattern, and look forward to making more as the cut is flattering, and I have always loved the drop waist silhouette. 

I have made a blue satin version of this dress (below) which can be found for sale in my shop.


Tuesday, September 8, 2015

Baby Print Halter Top - Advance 6394

This was my little project over the Labor Day weekend. I picked up a yard of this super cute pink baby fabric at a thrift store. I decided to make this vintage tank top as I had just enough material for the project.


I added some white piping around the neckline and back halter for some added fun to the fabric. The top is fully lined with a white cotton, and this pattern is meant to be so clean inside and out, I really think this could be a great little reversible top.


I added some 1/4" covered boning to the sides to add a cleaner shape and added support.


Lastly, this pattern calls for three bound buttonholes ONLY. I imagine this is to match the coordinating pattern skirt and shorts. Since I wasn't going to make those pieces at the present time, I had to add two more buttonholes. Due to time constraints, I decided against the bound buttonhole option for just standard buttonholes instead.


As pictured above, the pattern size I had was a 16 (Bust 34). The finished measurements were Bust 36" and Waist 31" with length from shoulder 21", from underarm 13.5". You can now find it for sale in my shop!

Friday, August 28, 2015

1930s Day Dress Reproduction - Butterick 5764


I snagged this pattern, and fell in love with both views. They were both different enough to where I felt I could get good mileage out of the pattern, and they each had really interesting design details. I wanted to try View C first as I HAD to know how that collar was formed.

NOTE: If you start out collecting vintage patterns, the best advice I can give you is to trace the pattern pieces, markings, grain lines, etc on pellon or drafting paper. Patterns are made of a very thin tissue paper that easily tears, and this problem accentuates with the age of the pattern. If you make a pellon copy, you have a very sturdy replica to work with and alter over and over again. I would also suggest photocopying the pattern layout and instructions as the original paper can be very fragile as well. I usually do all of this and keep all my pellon pieces, original pattern, and copied instructions in a large zip lock bag.


I actually started this reproduction November 2014. There are times when I progress with a project, and am not completely convinced I made the best fabric choices, and so I stall....and stall....then stall some more. (Cue the confessional organ) I prefer working with chiffons, rayons, and similar fabrics that have a very fluid drape. I kept going back and forth about the fabrics for this dress. I knew I would most likely have to use a crisper fabric to keep the intention of this as a "day dress", but I had that 1930s chiffon drape dancing through my head. I finalized on this cotton butterfly print with black peachskin for the contrast.


I got this far, and lined the bodice. I still was not entirely convinced of my choices, so the multi-month conundrum started placing the project to the side. Before you know it, its now 9-10 months later. Pieces have been moved continuously around my sewing room. Then, I don't even know if I still have all the pieces, what has been cut out, what still needs to be cut out....its utter turmoil, cats and dogs living together, and somebody just thought of the StayPuff Marshmallow man!!

Oh yeah....then there was this other issue with the pattern..... lol a natural back keyhole!!!

The back of the collar was finished with single fold bias tape, and there was a significant crescent gap between the collar and the back base neckline. I ended up having to draft two pieces to 'fill the gap', which worked out perfectly. The picture above shows one drafted 'hole' piece already put into place.
Above and below show inside and outside with the drafted pieces and top stitched into place.
Another design issue with this pattern was that it called for bound buttonholes at the center front neckline where the two buttons are sewn. The buttonholes were to be placed on the collar, but after looking at how the collar sat, there just was not enough room for a buttonhole, much less a bound buttonhole in the space these were to be placed. So....I decided against this design aspect and just attached the buttons as embellishment.

Next, I finished the skirt pieces with lining, and felt that the print was busy and needed a 'break point'. I decided to use the belt pieces to make an elastic waistband. This acutally helped with the shape, which is always a bonus. I've never been a 'belt person' anyway, so this was the perfect compromise.
Most patterns from the 1930s and earlier call for a snap closure because zippers were not widely used until the 1940s. As such, I opted for a zipper closure at the side instead of keeping the snap placket.
The last change on this dress was made to the cuffs. The directions have you gather the sleeves, finish with binding, then add the French cuff.


Above, I added the binding as directed. Then I attached one of the cuffs....and yet....another snag! As you can see below, the cuff is not made to attach to the entire banded sleeve. As a result, the cuff does not sit correctly. Also to note, the cuffs are on the small side. I am of a smaller bone structure. My forearm is 7"/17.5cm circumference where the cuff was going to sit. It was way too tight on me, so I tried making the cuff a conventional style. Alas, it was still too small, and I was not happy with the fit. Aesthetically speaking, I also felt that this cuff just made the dress look too heavy. The sleeves sit at 3/4 length already, and then you add the cuff. It sits in a weird place, looked odd, the cut was uncomfortable.

After much consideration, I just decided to scrap the cuff altogether. I added a keyhole design to add a bit of pizzazz, and finished with a black piping and loop button cuff.


Overall, I really enjoyed making this dress, and am most pleased with the result  The cotton was the better choice as it keeps the shape of the pleats as intended. Lets face it, that collar is to die for!! You can now find it for sale here.

Friday, July 31, 2015

Pattern Review - 2015 Historical Fashion Contest - Past Patterns 4998


Past Patterns 4998 made circa 2001 with floral rayon georgette
Oh lawdy! I had entered this contest, and was so short on time to complete it!! If you don't know about PatternReview.com, they are a website with thousands upon thousands of members with varying sewing experience. You can find reviews of all sorts of patterns, sewing machines, and even find a tutorial or two. They hold monthly contests, and this was my first entry into one.

This contest was for any costume reflecting any period of fashion from the 1920s and earlier. Most likely I will not win as my little dress is competing against Renaissance era gowns, etc with tons of detail and layers. Here is the Gallery of all those that entered. Either way, it was a good way for me to get my feet wet in the whole experience, and as Brando once said....I coulda been a contenda!!! LOL

Because I was short on time, I stuck with a pattern I had worked with before: Past Patterns 4998 - 1929 Slip On Evening Frock and Bolero Jacket. Past Patterns is a wonderful resource for authentic past decade patterns (1940s-1780s) that have been reproduced for sale at a very fair price!


Since I had worked with this pattern before, I knew I could whip this out pretty quickly in the time frame I was working with....1 whole day!! I used a midnight blue (almost black) poly chiffon lined with a linen blend peach shantung. I had to make a slight alteration to the skirt pieces and my chiffon. The skirt pieces are supposed to be cut on the fold, but I didn't have enough of my chiffon. To compensate, I cut the pieces with a small center seam on both the front and back skirts.

The neckline and armholes are finished with bias tape. Attaching the skirt to the bodice is the only difficult part of this pattern. When pinning the right sides together, the bodice has an 'arch' shape while the skirt has a 'U' shape. I sewed most of this area on the machine, taking it slow to move any full ease out of the way and making sure my bodice underneath wasn't folding up. I then hand sewed the side hip area where all my pieces met.

The result was pretty stunning, although I wish I had had time to do some beading and/or appliques.


Voting ended on August 9th, and with the final stats now posted, I placed 8th out of 18 garments. Honestly, that is much better than I thought I would end up. Congrats to the winners and all those that participated. I get inspiration from seeing what other people create, so something like this is always a win-win for me. Well....on to the next contest for August ~~ The Inspired by Books Contest!


Saturday, July 25, 2015

Cocktail Rebel - Butterick 5603 (sort of)

My second dress for the Cocktail Rebel event was made for, and worn, by my life long gal-pal Kassy. When asked what she wanted to wear to the event, she sent me this picture.
 

She wanted a high neckline, so looking through my pattern stash, I found Butterick 5603.


Originally, I had wanted to turn the skirt panels into box pleats, with gussets placed in between each at the waistline. After reading many reviews on this dress pattern, I constructed my muslin with the changes I wanted to make. As many  had previously reviewed, the fit through the waist was very poor. I ended up keeping the bodice, and scrapping the rest of this pattern. I drafted a midriff piece, then drafted my box pleat panels and gussets.

The pattern had a band and bow at the front neckline, but I ended up taking my contrast material and draped a faux-scarf. I also scrapped the underbust band, but kept the bow.

In lieu of the lining on the bodice, I constructed another shelf bra by duplicating the bodice and adding a 1" elastic band cut 1" short of Kassy's under bust measurement. An elastic bra hook was placed on the elastic band, at the side opening.

I sewed the shelf bra and dress together like a lining at the neckline, then top stitched. The arm straps were way too thin to construct as a regular lining and to be able to turn everything inside out like I would need to. Because of this, I kept the shelf bra and dress armholes together, and finished with single fold bias tape.

I would have taken more pictures during the construction of this dress, but this was one of those pieces I kept running into issues with. So many, in fact, I was not even sure I was going to be able to finish it in time. Many of these issues were due to my mistakes more than anything else. If you've been sewing for a while, that is just how some projects go!

Once I was on more solid footing with this project, I decided to add two scarves to the back, continuing the drape of the front neckline. I drafted the pieces, gathered them at the shoulders, and let them hang freely to the length of the dress. This was absolutely the perfect touch!

All the frustrations were worth it as she looked absolutely beautiful for our event!!


Cocktail Rebel - Butterick 5882 - Cha Cha's Dress

Cocktail Rebel was a Rockabilly event at the beautiful McNay Art Museum. Upon deciding to attend with two of my girlfriends, I asked them what they wanted to wear. My BFF sent me a picture of Cha Cha's prom dress featured in the movie "Grease".


I had Gertie's retro pattern, Butterick 5882, that I had been wanting to try.


I wanted to keep the ruffles from the Cha Cha dress, at the bust. I pulled out a damaged vintage peignoir set that I was saving for such a project.


I had also recently snagged some small shoulder pads at a thrift store, and immediately thought I would try something new. I wanted to place a shelf bra in the dress with padding at the bra cups. I decided to sew the shoulder pads together to make a full circle. I then added elastic, slightly stretched, around each top half of my 'cups' to ensure coverage and give each a more natural shape.

I then encased each cup in the peignoir fabric, and hand sewed the peignoir ruffle collar to the areas of the cups that would be exposed. My shelf bra was made by taking the bodice pieces to slightly below the bust area. I used a thin, lycra poly knit and added a 1" elastic band, cut 1" short of my my BFF's under bust measurement. I then added an elastic bra hook to the back.

 
I sewed the top of the shelf bra to my main fabric like a would a lining, leaving the center back unattached. Once all was placed together, and my zipper was placed, I then hand sewed my bottom bust ruffle trim, securing the outside dress to the bra cups to prevent separation of the pieces while in wear

One additional change was that I changed the arm straps into a halter.

I could not be happier with the end result, and my BFF was gorgeous!!
.


Thursday, June 4, 2015

A Brief Fashion History Part 3: The 1930s

The stock market crash, known as Black Tuesday, occurred in November of 1929. The over-indulgent 1920s suddenly halted to a new stark reality of economic vulnerability. The 1930s saw two broad spectrums in fashion, one of glamour and the other born of poverty in what is known as The Great Depression.

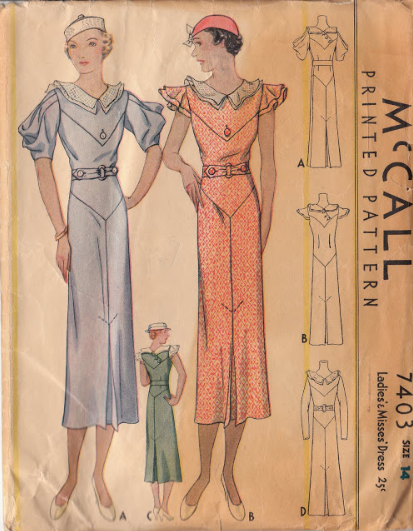
Fashion of the 1930s saw the birth of the tea dress. Dresses became more contoured, waistlines rose, and hemlines dropped to mid to lower calf or 'tea length'. These were often made of chiffon and adorned with ruffles (a.k.a. jabots), flutter sleeves, and the art deco beading of the 1920s was now seen in interesting deco seam lines.

Day dresses saw interesting, higher necklines, bows, single pleated skirts, and puff sleeves often made of linen.

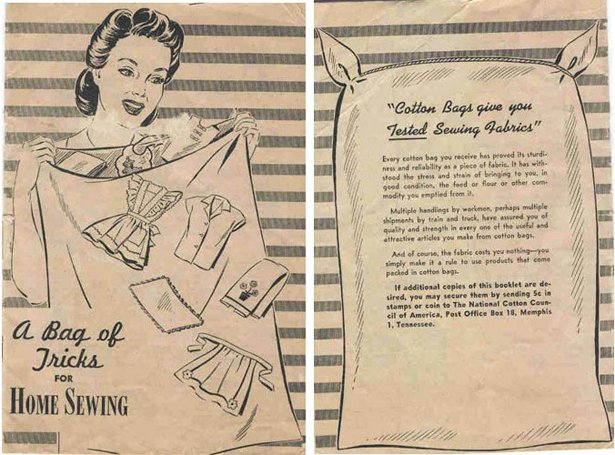
The tea dress and day dress are general changes seen in the 1930s. As mentioned previously, this time period in the U.S. experienced economic disparity. The market crash was just the beginning as those in the mid-west were suffering from a record long drought. Farmers had over planted, depleting the once rich soils. With no modern forms of irrigation, nutrient depleted lands, and long periods of drought, farmers literally saw their crops turn to mere dust in what is referred to as The Dust Bowl. Feed supply companies found it more difficult to sell their goods, and came up with the idea of packaging feed in floral printed cotton sacks. Sales rose as families re-purposed these bags into clothing and other household necessities. Thus came the entry of the 'feedsack dress'.

These dresses were cotton, so they were easy to care for, and usually had a small floral (a.k.a. calico) print.

Even farther out west, a glimmer of hope would arise in Hollywood, California. American cinema was widely seen in a movie called "Birth of a Nation" in 1915. From that point up until the late 1920s, films were produced with music overlays and graphics of scripted conversation known as the Silent Film Era. While wildly popular, cinema shifted with conversational soundtracks in the late 1920s to give birth to 'the talkies.' This new innovation would give rise to the Movie Star. For the first time, audiences could see and hear those on the screen, giving the actors a new dimension of identity. 

At a time when most of the country was experiencing deep poverty and despair, Hollywood churned out films filled with stories of wealth and glamour. Hollywood knew the country needed a respite from the reality of their daily struggles, something starkly different to raise hopes and dreams. It was a risky gamble, but what arose were icons of inspiration. The 1930s lifted the careers of Ginger Rogers and Fred Astaire, Mae West, Sonja Henie, Clark Gable, and many many more. The most iconic, though, for this time period was Gene Harlow. Her platinum blonde hair, thin arched eyebrows and pouty doll-like makeup, and brash film personality left audiences equally mesmerized and entertained. She is known as THE sex symbol of the 1930s. Much of this also has to do with a style she made famous. Forever, her legacy will be infused with the 1930s satin bias cut dress. 
This was an extravagant dress for its time. Most people don't know what 'bias cut' means and why the fabric drapes so differently in this style. I'll explain this very briefly below.

When you buy fabric, it is folded in half in a long continuous strip measured in yards. An average dress is cut vertically on the folded fabric. A bias cut is cut horizontally with the fabric fold open.

A traditional cut dress with fabric folded. Pattern pieces are placed horizontally onto the fabric. "Selvages" are the opposite end of the fold, where the open ends of the fabric meet.
 A bias cut dress. The fabric is open and the pattern pieces are placed diagonal.
The fabric reacts differently when bias cut. It drapes and stretches like a traditional cut dress wouldn't. This distinction is important because while so many families used re-purposed feed sacks to clothe their families, the new bias cut dress wasted as much, if not more, fabric than what it used. The practicality of wasting so much fabric was just not viable for most women of the 1930s. Still, this is the image most people equate with 1930s fashion.

As The New Deal was signed, and new infrastructure jobs put the poor back to work, prosperity started to rise once again by the late 1930s. The country was on the mend but activities across the Atlantic would soon arise and take women out of the home to work in factories, causing yet another, more practical change in fashion. I'll go into more detail in the next segment covering the 1940s.